

Table of Contents
Here is all you need to know on Google Cloud WordPress Hosting ?
I’ll show you how to host a WordPress site on a Google VM instance in this article. After that, I’ll go over how to install WordPress on a Cloudways managed Google cloud server in more depth.
Cloudways is a managed cloud hosting platform that, owing to an easy-to-use interface, allows you to host your apps on Google cloud servers. GCE’s integration with Cloudways gives you a whole new world of managed WordPress hosting, with unbeatable dependability, speed, and uptime.
Before we go into the steps to get Google Cloud WordPress hosting, it’s important to understand why a Google cloud server is an excellent choice for hosting your WordPress blog. Why do people prefer managed WordPress hosting like Cloudways over native Google cloud web hosting when it comes to Google Cloud WordPress hosting?
The Advantages of Using Google Cloud to Host WordPress?
Google Cloud is one of the most advanced, dependable, and quick cloud infrastructures available. Google Compute Engine (GCE) is an Infrastructure as a Service (IaaS) offering that allows clients to run workloads on Google’s physical hardware. GCE is used by major corporations such as HSBC, Twitter, PayPal, and Bloomberg for their hosting needs.
Here are some of the reasons why using Google WordPress hosting for your website is a good idea:
Uptime
More than 99.9% of the time, Google Cloud Engine is accessible. Businesses like huge ecommerce stores, trading sites, and news sites rely greatly on ideal server uptimes because even a minor outage can result in significant financial loss.
Speed
We all know that Google (nearly) owns the Internet, therefore if you want to rank first in Google SERPs, you must be on top of your game. Google hosting WordPress websites makes them faster, and speed is one of the most critical ranking signals that Google considers when deciding where to place pages in the SERP.
Reliability
GCE is built on the same platform as Gmail and YouTube. When was the last time you spent free time watching YouTube videos or sending emails through Gmail? Of course, you don’t.
This implies that by using Google’s cloud infrastructure to host your website, you’ll be using the best hardware and data centres accessible.
Google Cloud’s staff works relentlessly to develop its services so that they outperform their competitors. They accomplish this by automating configuration changes, adding an extra layer of verification to detect any possible issues, and closely monitoring the impact of changes on the infrastructure.
Scalability
GCE servers are extremely scalable and can easily handle unexpected traffic spikes, and you can raise or lower the size of your server without altering the IP address. You may also monitor your server’s performance and scale it up or down using Cloudways. There are a variety of cloud infrastructure monitoring softwares available that allow customers to keep track of the performance of their cloud infrastructure.
Two Methods for Google Cloud WordPress Hosting
The first way is more complex for Google Cloud Platform gcp wordpress hosting and necessitates intermediate knowledge of Linux commands as well as a basic awareness of various stacks. Patching, OS upgrades, firewall setting, and backups are all difficult procedures that require manual execution by the system administrator or server owner when managing a Google WordPress hosting.
However, with the second option via Cloudways Google Cloud Platform gcp wordpress is easy , you can deploy your server and WordPress application in only a few clicks.
Why should you use Cloudways to host WordPress on GCE?
If you don’t have any prior experience with cloud server management and choose to run WordPress on Google Cloud’s native platform, its not everyone’s cup of Tea…
Using GCE as a WordPress user is not simple. Even before installing WordPress, there is a lot to accomplish. You must first acquire a Google hosting instance and then set up an SSH connection.
Simply said, the procedure is extensive, and numerous issues might arise.
Cloudways, on the other hand, makes things simple! Simply sign up, and a Google Cloud server with WordPress installed will be waiting for you in a few minutes.
How to Setup Google Cloud WordPress Hosting Server?
In this method, I’ll install a WordPress application on a Google VM Instance running a LAMP (Linux, Apache, MariaDB, and PHP) stack. As a result, the first step is to register a Google Cloud Platform account, and then you must validate your account by providing your credit card number. get started from there…
How to host WordPress website on google cloud for free / Yourself ?
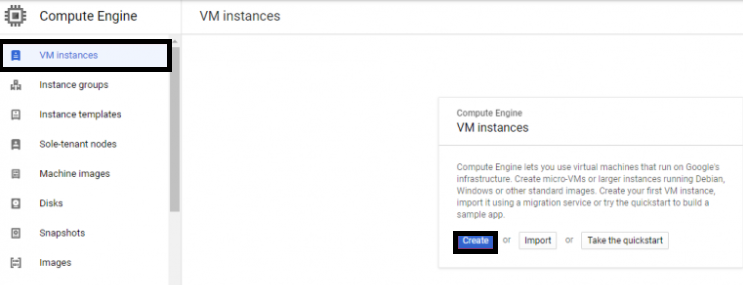
Create a new VM instance in Google Compute Engine
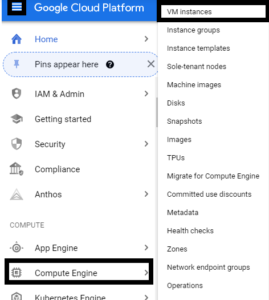
Once your account has been authenticated, go to Navigation Menu > Compute Engine > VM Instances.
You will notice that there is now no VM instance on your GCP, so simply click create a new vm instance.
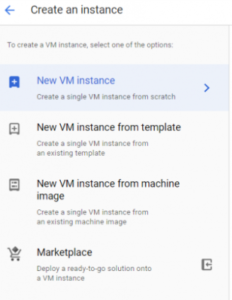
Create VM in GCE GCP
Create new VM Instance
You can specify server configurations and other parameters for your server on the Create an Instance screen, including server location, machine type, and more.
Details of a new virtual machine instance are given like the server name field. After that, choose the server nearest to your intended audience. The server location is broken into two parts: Region and Zone. Region refers to your server’s geographical location, while Zone refers to a server’s deployment area inside a region. I recommend that you choose the location that is closest to your users.
The machine configuration section follows, where you can select the machine family, series, and type. On the machine family area, there are four possibilities available and I’ve chosen General-purpose and series E2. You can select the server computing power, such as the number of vCPUs and RAM, from the machine type like any other cloud computing providers.
After that, click to the Boot Disk section and choose an operating system to install on your Google cloud server. I’m going with Debian 10, which is the default. You can change your operating system or switch to a different version, such as Linux, CentOS, by clicking the change button and selecting your preferred OS.
Next we Leave all of the sections except Firewall -> double-check both Firewall rules ->Allow HTTP/HTTPS traffic
Now that your VM instance has been created, you may click Create to launch your new server. Creating your Google cloud server will only take a few minutes.
Install the LAMP Stack for Google Cloud WordPress Hosting?
You’ve just finished setting up a new Google cloud server, and now it’s time to set up the LAMP stack on it. To do so, click SSH to run your server in SSH mode by clicking on SSH on the Right side on the Server
SSH google cloud
Following that, you’ll be sent to the Google terminal, where you’ll run a series of Linux commands to set up your LAMP stack.
From Terminal google server you need to run below commands for configurations
All you have to do now is follow my instructions and run the commands below.
1.Below command will update the list of packages.
sudo apt update
sudo apt upgrade -ysudo apt install apache2 -y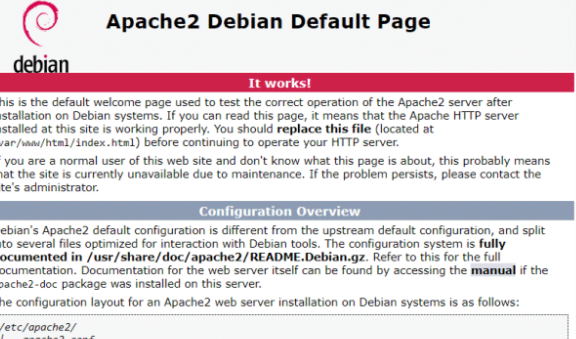
5.To install MariaDB on your Google cloud server.
sudo apt install mariadb-server -y
6.To improve the security of your DB installation.
sudo mysql_secure_installation
7.After running the above command, you need to enter the root password. By default, there’s no current password, so you just need to press Enter.
- If you want to set the root password for your database, press “y” and simply update it.
- Similarly, you can change other security settings as well.
After this, you need to install PHP and other modules as well. Install PHP 7.3 and other modules.
sudo apt install php7.3 libapache2-mod-php7.3 php7.3-mysql php7.3-common php7.3-mbstring php7.3-xmlrpc php7.3-soap php7.3-gd php7.3-xml php7.3-intl php7.3-ldap php7.3-zip php7.3-curl -y
8.To restart the Apache.
sudo systemctl restart apache2
Install WordPress Application
1.Next to install WordPress, you need to run the following commands:
sudo mysql -u root -p
To access the DB root and you will need to enter the root password which we have previously set up during the MariaDB setup/installation.
2.Create a new database.
CREATE DATABASE dbword;
3.Grant full control and permission to a user.
GRANT ALL PRIVILEGES on dbword.* TO 'vbr'@'localhost' IDENTIFIED BY 'AlphaBravo';FLUSH PRIVILEGES;
5.Now run the exit command to exit.
Exit
6.Change your directory to the HTML folder.
cd /var/www/html
7.Install GNU Wget
sudo apt install wget
8.Download the latest WordPress version.
sudo wget https://wordpress.org/latest.tar.gz
9.Extract the archive file.
sudo tar wp latest.tar.gz
sudo chown -R www-data:www-data /var/www/html/wordpress/
11.Restart your Apache2.
sudo systemctl restart apache2
12. Now, open the WordPress file (essentially the WordPress website) in the browser “http://yourIPaddress/wordpress.”
13. Next, follow instructions for install like choose the language, click continue, click Let’s go!
14.Next step, provide the DB Name, Username, and Password (values while creating a new DB) and click Submit to connect the database with WordPress. Change table prefix if you like.
15.Then run the installation and enter the WordPress site information you are creating including the username, password etc… and click Install WordPress.
16.Final Steps would involve is log in to your WordPress dashboard. Hooray..
For a person with previous Linux environment experience this should be easy but someone who does not can face challanges.
Install ” Google Cloud WordPress ” on Cloudways Managed Google Cloud Hosting
What’s more, you don’t even need any server experience to build a GCE server on Cloudways!
Cloudways not only manages your server, but it also optimizes it and keeps it up to date with the latest software. Cloudways also provides live chat support 24 hours a day, 7 days a week to help you troubleshoot any issues you may have and ensure a smooth experience.
1. Create an account with Cloudways.
Sign up for Cloudways and test drive your GCE server for three days. You will get the opportunity to become acquainted with our platform’s user interface and to feel the power and flexibility it offers.
Simply fill up the relevant information and click the “Start Free” button. There’s no need for a credit card, and there’s no obligation to buy anything.
What’s more, you don’t even need any server experience to build a GCE server on Cloudways!
Cloudways not only manages your server, but it also optimises it and keeps it up to date with the latest software. Cloudways also provides live chat support 24 hours a day, 7 days a week to help you troubleshoot any issues you may have and ensure a smooth experience.
1. Create an account with Cloudways.
Sign up for Cloudways and test drive your GCE server for three days. You will get the opportunity to become acquainted with our platform’s user interface and to feel the power and flexibility it offers.
Simply fill up the relevant information and click the “Start Free” button. There’s no need for a credit card, and there’s no obligation to buy anything.
To complete the signup procedure, you must now validate your email address. To start the server launch procedure, click the Launch button after you’ve successfully signed up.
2. Choose an application
Choose your preferred WordPress version from the drop-down menu and give your Application, Server, and Project a name.
You can launch Cloudways Optimized WordPress, WordPress with WooCommerce, WordPress Multisite, or WordPress without any optimization.
3. Pick a Web Hosting Server
As your cloud server, go with Google’s GCE Hosting Platform. This refers to cloudways service providers.
4. Determine the size of the server
You have the option of selecting the server size that best suits your needs. Cloudways provides scalable WordPress hosting, which means you may scale up and down your server at any time by going to Server Management > Vertical Scaling.
5. Choose your bandwidth and storage options.
To keep expenses down, Cloudways allows you to choose bandwidth based on your needs. You can also select alternative database and application file storage sizes.
6. Choose a location
Select the data centre that is closest to your intended audience. You have the option of hosting in numerous regions and locales using GCE.
7.Get Credentials for wordpress
Go to Application Management > Access Details > Admin Panel to access your WordPress website. Your WordPress application’s admin credentials (username and password) will be displayed. To access the WordPress admin panel, click the URL and then copy and paste the credentials.
Conclusion:
That concludes our Article here….WordPress has been successfully launched on Google Cloud.
2 Ways to configure Google Cloud WordPress or GCE WordPress or GCP WordPress .
I will soon come up with few more intresting articles on Migrations etc..